A Gardening Life – June 17
Do you have an area that needs screening but you want something that blends into the garden? That was my situation; we have a brush pile and compost area that is necessary but less than attractive. My initial thought was to plant some Emerald Green Arborvitaes in front of this area, so these went in two years ago. They have made a nice backdrop for the plantings in front of the piles but don’t completely hide what’s behind.
Almost more objectionable than the compost and brush piles is the equipment that is frequently left by the pile. This space is home to a chipper, Rototiller, garden cart and other tools, many of them a “Pay attention to me!” shade of red. When the weather is wet my husband covers the equipment with tarps. These are now brown after I insisted he exchange the blue and orange tarps for a more invisible shade. In the garden, color matters.
There had to be something more to block this utility area, however, but I didn’t want a structure or planting that would call attention to itself. So this summer I decided to act on an idea I’ve had for building rustic fencing. I asked my husband to pound several lengths of rebar into the ground in a curve behind the arborvitaes.
I took branches that came down in last winter’s storms, plus some small limbs that we cut off of low-hanging trees in order to bring more light into garden beds, and began making the screening.
Sometimes we have ideas that don’t turn out as we’ve envisioned while in other instances our plans come out well enough. Occasionally a design or solution will work brilliantly. No matter what the outcome, however, the process alone is deeply satisfying. Starting with an idea or inspiration, working it through and bringing the project to completion is gratifying.
I have almost completed a nice screening, but more importantly, I’ve had a enjoyable creative experience.
(For more how-to, see Sharing the Wealth below)

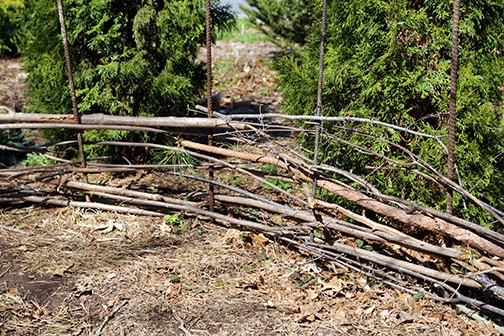
Here is how the inside of the screen looked when I was getting started.

As you can see, it doesn't absolutely hide the utilities behind the screen, but it does soften things significantly.

Here is how the outside looks from one end. You can see that sometimes ends stick out...that's the "rustic" part. 🙂

I'm almost finished for now...another six to eight inches up. You might have to use thinner branches as you near the top because there is less give in the rebar toward the end of the project. See that bit of red through the screen? The chipper, sigh
Sharing the Wealth
Making Your Own Rustic Screen
- Be sure to make the rebar long enough that you can stick the pieces into the down into the ground 18” deep or more. Once you start weaving the sticks into the structure they will be putting pressure on the rebar so a good anchor is needed.
- Space your rebar pieces according to the size of sticks or limbs you want to use. If you’re planning on using fine sticks that are less than an inch in diameter, space the rebar pieces a foot to sixteen inches apart. If you are using sticks that range from two inches in diameter down to a half of an inch around, space the rebar about two feet apart.
- Whether you’re creating a curved screen as I did or something straight, it’s easier to work with straight sticks than curved ones.
- Working with green wood is much easier than working with dried branches. The green wood bends around the rebar more easily.
- Begin weaving the pieces in and out of the rebar, working over and under, over and under. After you have one layer do the opposite on the next row: under and over, under and over.
- One stick does not have to go from one end of the screen to another, but one stick will need to be woven around at least three pieces of rebar in order to have it held in place. If your branch ends before the end of the screen, start another one right on top of it a post or two before the last stick stops.
- After you have a few sticks in place push down on them to make the screen denser and to hold everything in place.
- Don’t always place the thick ends of your branches at one side; vary where you put the thickest parts of the branches you’re weaving, moving from one side to another and sometimes putting a larger branch in the center.
- My plan is to push the sticks down toward the earth as they start to decompose, and put fresh ones on the top. I’ll let you know how this works.

